Balsamic Roasted Grape Pizza

Balsamic Roasted Grape Pizza

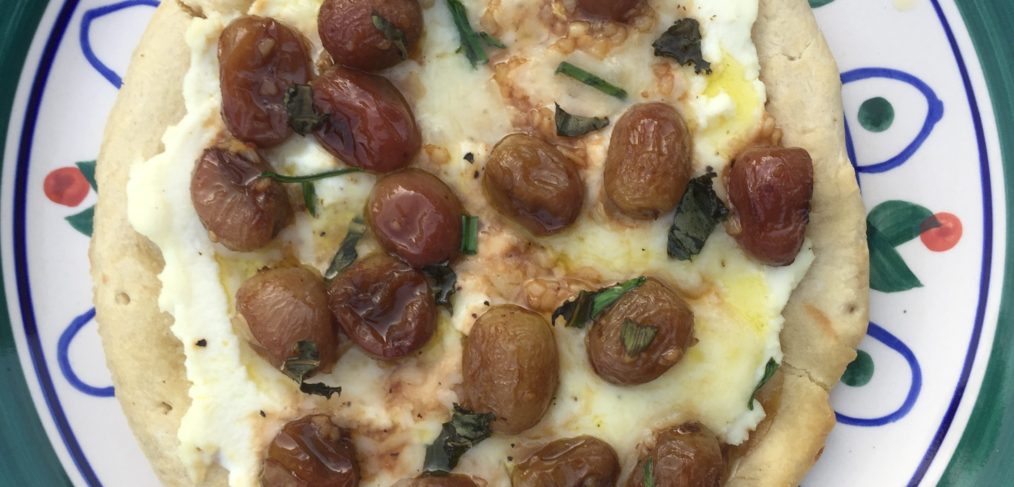
My current craving as summer approaches: fruit on savory pizza. Fruit pizza for dessert (you know the one, with the cream cheese layer and sugar cookie crust) is divine, but I’m fancying fruit this season as a topping for a dinner pizza. Figs, dates, and apples are all great additions to flatbreads to add sweetness and texture, but grapes are great because they retain their juice even after roasting. This pizza is a snap to assemble and will disappear in a snap too. Grilling the crust would also be tasty for a quick meal, or cut the pie into bite size pieces for a party appetizer.

Roasted Grape Pizza

Yield: 4 mini pizzas

Ingredients:

For the grapes:
1 1/2 c. seedless red grapes
3 T. balsamic vinegar
3 T. olive oil

For the pizza:
4 – 8 inch prepared pizza crusts (I used pre-packaged mini crusts from Kroger, but feel free to make your own or buy the kind in the tube and roll them out)
1 c. ricotta cheese, divided into 4 portions
2 T. olive oil
2 T. chopped fresh basil
3 T. chopped fresh chives
4 cloves garlic, chopped
1/2 c. mozzarella
1/4 c. grated Parmesan

Preheat oven to 425 degrees. On a rimmed baking sheet sprayed with cooking spray, spread out grapes. Drizzle on oil and vinegar, toss grapes in mixture to coat. Season with salt and pepper. Roast the grapes for 10-15 minutes until the skins are just beginning to burst, stirring once halfway through. Allow the grapes to cool.

Balsamic Roasted Grape Pizza

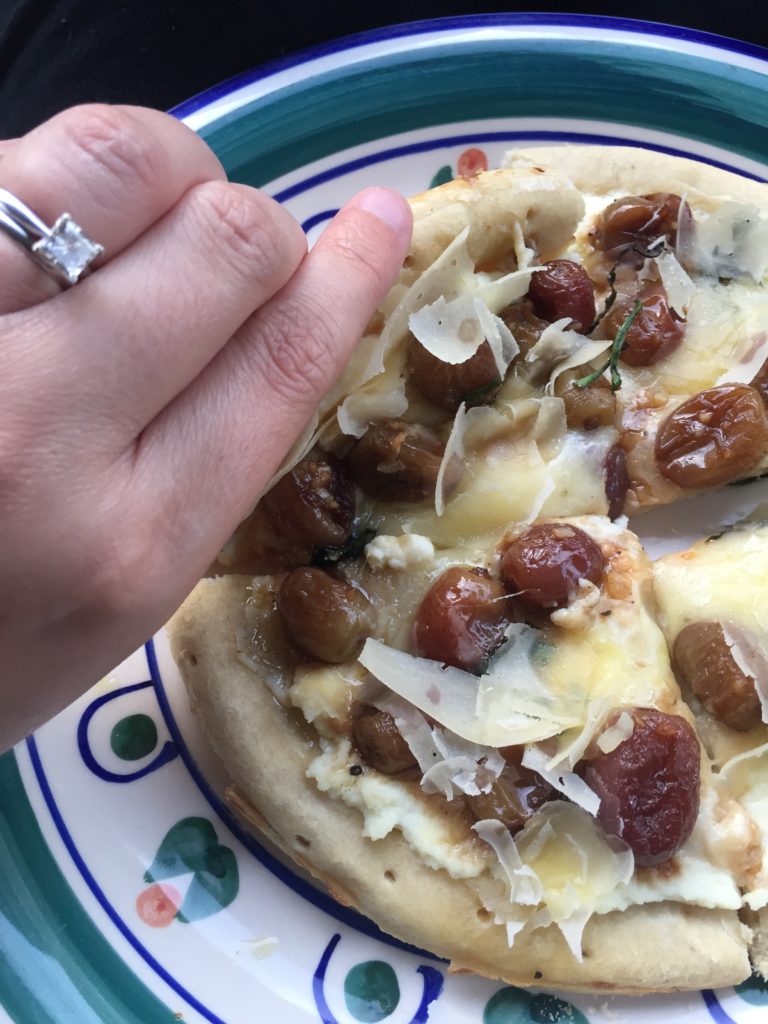
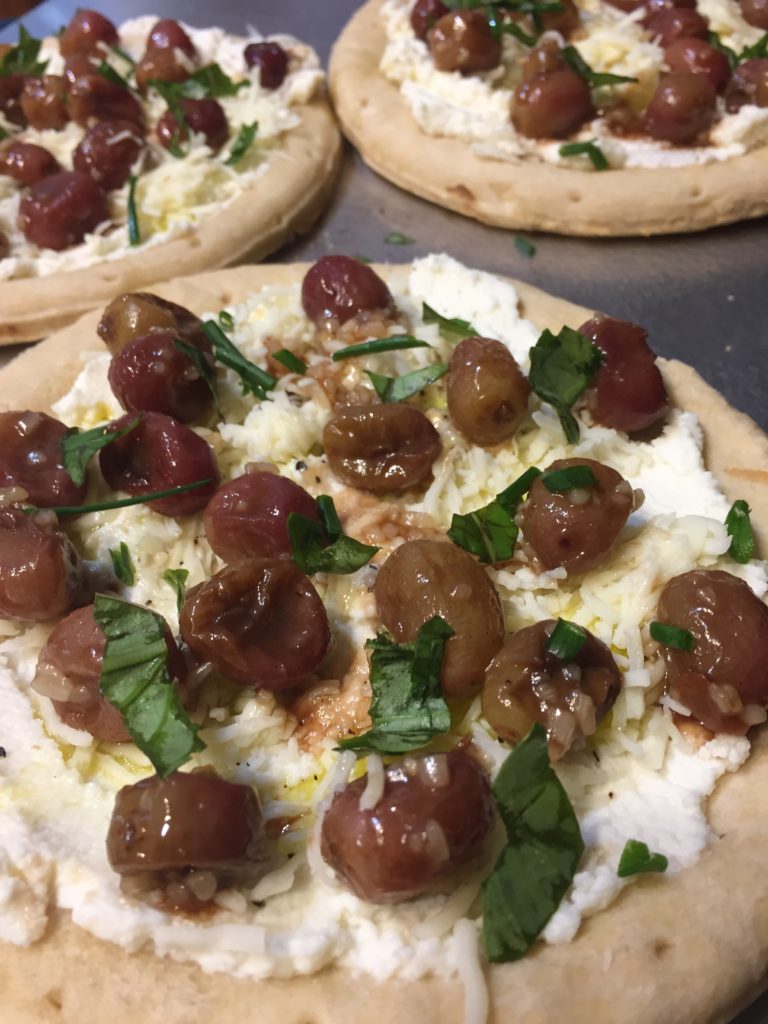
On each pre-baked crust, spread an even layer of the divided ricotta. Drizzle the oil atop the ricotta layer and sprinkle with salt and pepper. Next add the mozzarella and Parmesan, then top the cheeses with the garlic and the herbs. Finally distribute the grapes in an even layer, dividing them between the 4 pizzas. Bake the mini pizzas for 15 minutes in the 425 degree oven, until cheese is melted. Cut and serve!

I know grapes might sound crazy, but they add a stellar pop of sweetness. Shovel in every bite and let me know when you try the recipe; find my social channels here: Facebook | Twitter | Instagram

Keep Connected,

Caroline

Balsamic Roasted Grape Pizza
Author: 
Prep time: 
Cook time: 
Total time: 
Serves: 4
 
Ingredients
For the grapes:
  • 1½ c. seedless red grapes
  • 3 T. balsamic vinegar
  • 3 T. olive oil
For the pizza:
  • 4 - 8 inch prepared pizza crusts (I used pre-packaged mini crusts from Kroger, but feel free to make your own or buy the kind in the tube and roll them out)
  • 1 c. ricotta cheese, divided into 4 portions
  • 2 T. olive oil
  • 2 T. chopped fresh basil
  • 3 T. chopped fresh chives
  • 4 cloves garlic, chopped
  • ½ c. mozzarella
  • ¼ c. grated Parmesan
Instructions
  1. Preheat oven to 425 degrees.
  2. On a rimmed baked sheet sprayed with cooking spray, spread out grapes.
  3. Drizzle on oil and vinegar, toss grapes in mixture to coat.
  4. Season with salt and pepper.
  5. Roast the grapes for 10-15 minutes until the skins just beginning to burst, stirring once halfway through.
  6. Allow the grapes to cool.
  7. On each pre-baked crust, spread an even layer of the divided ricotta.
  8. Drizzle the oil atop the ricotta layer and sprinkle with salt and pepper.
  9. Next add the mozzarella and Parmesan, then top the cheeses with the garlic and the herbs.
  10. Finally distribute the grapes in an even layer, dividing them between the 4 pizzas.
  11. Bake the mini pizzas for 15 minutes in the 425 degree oven, until cheese is melted. Cut and serve!


Magic Chocolate Stout Cake

Magic Chocolate Stout Cake

When I went away to college, I knew one of the things I would miss the most was my mom’s cooking. So that I could attempt (the key word is “attempt”) to recreate some of our family’s meals, my mom created what has become my Bible, a handwritten collection of my favorite recipes in a spiral bound notebook. Included in her guide was this recipe for “pudding cake.” The version below is adapted from my mom’s, replacing the water in the original recipe with stout beer. I call it magic cake, because the cake creates its own hot fudge sauce during the baking process, making it the ideal treat to serve with ice cream. I love the coffee richness that the stout brings, and it’s a snazzy dessert to throw together at the last minute – it doesn’t even require eggs!

Mom's Cookbook


Ingredients:

For the cake:
1 cup flour
3/4 cup sugar
2 T. unsweetened cocoa powder
2 tsp. baking powder
Pinch salt
1/2 cup milk
2 T. melted butter

For the topping:
1 cup brown sugar
1/4 cup unsweetened cocoa powder
1 3/4 cup of your favorite stout beer

Start by preheating oven to 350 degrees, and spraying a 9×9 inch square pan with nonstick spray. In a large bowl, combine dry ingredients for the cake: the flour, sugar, cocoa powder, baking powder, and salt. Mix well to incorporate, and then slowly add in melted butter to dry ingredients, followed by the milk. Spread the cake mixture into the bottom of the 9×9 pan. In another bowl, mix the 1/4 cup cocoa powder and the brown sugar. Sprinkle this topping evenly over the cake batter. Next, microwave the stout for approximately 2 minutes, until just warm. Then pour warmed beer over the topping and cake mixtures. Bake the cake for approximately 40 minutes until cake portion is set. There will still be a “sauce” underneath the cake that will not set. Top with whipped cream or your favorite ice cream and serve warm.

Chocolate Stout Cake

Magic Chocolate Stout Cake
Author: 
Recipe type: Dessert
Prep time: 
Cook time: 
Total time: 
Serves: 6-8
 
Ingredients
For the cake:
  • 1 cup flour
  • ¾ cup sugar
  • 2 T. unsweetened cocoa powder
  • 2 tsp. baking powder
  • Pinch salt
  • ½ cup milk
  • 2 T. melted butter
For the topping:
  • 1 cup brown sugar
  • ¼ cup unsweetened cocoa powder
  • 1¾ cup of your favorite stout beer
Instructions
  1. Start by preheating oven to 350 degrees, and spraying a 9x9 inch square pan with nonstick spray.
  2. In a large bowl, combine dry ingredients for the cake: the flour, sugar, cocoa powder, baking powder, and salt.
  3. Mix well to incorporate, and then slowly add in melted butter to dry ingredients, followed by the milk.
  4. Spread the cake mixture into the bottom of the 9x9 pan.
  5. In another bowl, mix the ¼ cup cocoa powder and the brown sugar.
  6. Sprinkle this topping evenly over the cake batter.
  7. Next, microwave the stout for approximately 2 minutes, until just warm.
  8. Then pour warmed beer over the topping and cake mixtures.
  9. Bake the cake for approximately 40 minutes until cake portion is set.
  10. There will still be a "sauce" underneath the cake that will not set.
  11. Top with whipped cream or your favorite ice cream and serve warm.


2 Year Anniversary Spectacular: My Favorite Posts So Far

I’ll be writing more about this for the March newsletter (Click here to sign up for the newsletter), but this week Columbus Culinary Connection celebrated its 2 year anniversary! 131 blog posts, 4,200 Instagram (@cbusconnect) followers, and 8.3 million pounds of cheese later, I’m still enjoying being a food blogger. It’s forced me outside my comfort zone in tasting new cuisine, but also in making new relationships. It’s been a creative outlet, and given me a greater appreciation for Columbus and all things Ohio. I’ve enjoyed looking back at the posts I’ve written over the past two years, and daydreaming about the places I’ve visited, and of course the food I’ve devoured up to this point. Here are some of my absolute favorites!

Rockmill Brewery

http://columbusculinaryconnection.com/rockmill-brewery-review/
Rockmill Brewery

One of my very first posts, Rockmill is still a place that has a certain magic for me. The countless good times on the brewery’s grounds and in the idyllic horse barn-turned-taproom make this a spot I’ll always go again and again.

Kittie’s Cakes

http://columbusculinaryconnection.com/kitties-cakes/
http://columbusculinaryconnection.com/kitties-cakes-bexley/
Kittie's Cakes

The original German Village location and the new Bexley Kittie’s cafe have some of my favorite treats in town. Bacon cheddar scones, immense Facecookies, and shop mascot Linus the Golden Retriever make Kittie’s a must-try bakery.

My Family’s Christmas Cookies

http://columbusculinaryconnection.com/christmas-cookie-recipe/
Christmas Cookies

My mom was the guest writer for this post, and she’s the reason I am crazy about cooking. It’s one of my all-time favorite family traditions, and it’s been fabulous seeing so many other people take her recipe and incorporate it into their own holiday customs.

A Visit to: Biltmore Estate

http://columbusculinaryconnection.com/biltmore-estate/
The Biltmore Estate

I love exploring, and have embraced my inner history nerd. Our mini vacation to Biltmore Estate let me combine my admiration for both fine dining and Downton Abbey, and I loved every second of it. I also used this post as a template for my Charleston Gazette article, another writing opportunity that blogging has afforded me!

Fox in the Snow Cafe

http://columbusculinaryconnection.com/fox-in-the-snow-cafe/
Fox in the Snow Cafe

The effort put into blogging is worth it soley because I learned about Fox in the Snow through blogger friends. What had I been missing? Only the cutest animal logo in town and some heavenly custard-filled donuts.

Neighborhood Spotlight: Grandview Heights

http://columbusculinaryconnection.com/neighborhood-spotlight-grandview-heights/
Sweet Carrot and Zauber Beers in Grandview

It’s been great seeing so many new foodie destinations pop up in Grandview recently, and there are some classic oldie but goodie spots as well. There’s something for every palette in this Columbus ‘burb. I need to get around to making another neighborhood dining guide soon.

Por’Ketta Food Truck

http://columbusculinaryconnection.com/porketta-food-truck/
Porketta Food Truck

I love the ease and variety that food truck dining brings, and I tend to seek out my favorites time and again. Por’Ketta’s family business is doing some really fun things, and my adoration has not waned even after eating that chicken sandwich a hundred times.

Top Secret Chewy Chocolate Chip Cookies

http://columbusculinaryconnection.com/chocolate-chip-cookies/
Chocolate Chip Cookies

The secret is the cheesecake pudding! Trust me on this – it’s been my go-to chocolate chip cookie recipe for years. It makes the softest, tastiest cookies imaginable.

5 Queso Dishes to Try

http://columbusculinaryconnection.com/carolines-picks-5-queso-dishes-try/
Bodega Columbus: Loaded Truffle Fries

I have to end this round-up with another round-up! When you can list some of your most beloved restaurants in one cheese-laden post, i.e.  Hudson 29, Condado Tacos, and Bodega, what isn’t to love? I have a whole category on the blog of 5 to Try posts, when you’re in need of a quick reference guide.

Thanks for being on this journey with me! Cheers to another year of bacon and blogging.

Keep Connected,

Caroline

Banana Berry Smoothie Bowls

Banana Berry Smoothie Bowls

I’ve been loving the recent trend of smoothie bowls lately. Columbus has a noteworthy smoothie bowl scene, with the always tasty Alchemy, as well as Zest and Native Cold Pressed. But these bowl beauties are a snap to assemble at home. Blended fruit in a spoonable form allows for more toppings, and let’s face it, that’s the part that everyone really wants! These banana berry bowls are a dish that’s BLD-worthy (breakfast, lunch, or dinner approved), and the colors are perfectly Instagram-ready. It’s an ideal way to keep a meal on the lighter side, but not give up the fun factor.

Banana Berry Smoothie Bowls

Yield: 2 bowls

Ingredients:

For the bowl:
8 oz bag of frozen mixed berries (I used a bag of Kroger Very Berry Smoothie Blend)
2 frozen bananas, cut into chunks
1/4 c. peanut butter
1/4 c. milk

For the toppings:
1/4 c. peanut butter, melted in microwave
2 T. chia seeds
4 T. large flake coconut
Dried cranberries, chopped strawberries or bananas, slivered almonds, granola, mini chocolate chips, or any other toppings you desire

In a high-speed blender or food processor, start by combining the frozen bananas and frozen mixed berries. Pulse until the mixture is in pea-sized clumps. Then, add the peanut butter and the milk, blending until the mixture is completely smooth and very thick.

Blending ingredients for Banana Berry Smoothie Bowls

Scoop the smoothie mixture into two separate bowls for serving. Load each bowl up with your chosen toppings, dividing each item between the two bowls and arranging each topping in its own section of the bowl. I won’t tell if you add extra melted peanut butter! Swirl the whole thing together before eating and enjoy immediately.

Banana Berry Smoothie Bowls

PS: I got the frozen banana hack from http://minimalistbaker.com/ – it gives the smoothie a creamy soft-serve consistency.

Keep Connected,

Caroline

Banana Berry Smoothie Bowls
Prep time: 
Total time: 
Serves: 2
 
Ingredients
For the bowl:
  • 8 oz bag of frozen mixed berries (I used a Kroger Very Berry smoothie blend bag)
  • 2 frozen bananas, cut into chunks
  • ¼ c. peanut butter
  • ¼ c. milk
For the toppings:
  • ¼ c. peanut butter, melted in microwave
  • 2 T. chia seeds
  • 4 T. large flake coconut
Instructions
  1. In a high-speed blender or food processor, start by combining the frozen bananas and frozen mixed berries.
  2. Pulse until the mixture is in pea-sized clumps.
  3. Then, add the peanut butter and the milk, blending until the mixture is completely smooth and very thick.
  4. Scoop the smoothie mixture into two separate bowls for serving.
  5. Load each bowl up with your chosen toppings, dividing each item between the two bowls and arranging each topping in its own section of the bowl.
  6. Swirl the whole thing together before eating and enjoy immediately.


Wine Slushies

Boozy Recipe Round-up with Drink Up Columbus

I have to kick off another year of blogging with 2 wonderful things: local libations and easy recipes. The solution: sharing a collection of the booze-infused concoctions I’ve created for Drink Up Columbus. If you haven’t checked out Cheryl Harrison’s website, which showcases news about the Cbus craft beer and spirits scene, click here ASAP. It’s been fun finding a way to sneak adult beverages into some of my favorite foods, or create new cocktails with a Columbus twist. Below, you’ll find some simple ways to wow your Super Bowl party guests or stir up an elegant champagne sipper.

Keep Connected,

Caroline

Bring Us a Figgy Pudding (or a Fig Rosemary Sparkler)

Fig Rosemary Sparkler
And bring it right here! Ring in the new year in style with this simple and stylish libation. The cocktail starts with bourbon and foolproof Fig Rosemary simple syrup, all topped off with the celebratory staple of champagne. This is a sipper to savor on December 31st! READ MORE…

Forget Taco Tuesday: Drunken Tostadas

Forget Taco Tuesday: Drunken Tostadas
Listen, I love tacos as much as the next gal. But sometimes you want something different! The solution is to switch up your vessel. Tostada shells are better than tacos because you can layer them as high as you want without judgment. Plus since they are open-faced, you can put an egg on top. And the number one rule of cooking is: a runny egg on top makes anything taste good. I think Julia Child said that. Or maybe just me. When you use beer and enchilada sauce to slow-cook the shredded beef, you’ve got the perfect quick dinner in no time. READ MORE…

Super Bowl Slice: Razz Wheat JELL-O Shots

Super Bowl Slice: Razz Wheat JELL-O Shots
It’s time for the Super Bowl! Take a break from watching all that football and those zany commercials, and indulge in something that will please any partygoer: Jackie O’s JELL-O shots. These wicked little wedges are disguised as orange slices, but they use local Razz Wheat beer instead of water, for obvious reasons. But because the beer doesn’t provide quite enough punch, let’s booze it up! I’ve added some moonshine from Mill Street Distillery to kick it up another notch. No matter which team you’re rooting for, these fruity treats will score a touchdown with your guests. READ MORE…

American Pie: Boozy Double Apple Pie Parfait recipe

American Pie: Boozy Double Apple Pie Parfait recipe
Let’s put it out there: you love pie, but you’re lazy. It’s ok, no judgment. Sometimes you just don’t feel like coring 14 apples and making a basket-weave out of dough, right? But there’s nothing more American than apple pie and alcohol, so combine your affinity for apple pie with your adoration of Brothers Drake Apple Pie mead, and you’ve got an easy parfait that’s perfect for the winter months. Brothers Drake’s mead is sublime on its own (especially in the bourbon-barrel aged variety) so adding the Apple Pie mead here amps up the fruity goodness of the pie filling! READ MORE…

Apple of My Eye: Salty Caramel + Apple Infused Whiskey

Salty Caramel + Apple Infused Whiskey
Summer is waning, and it’s going to start getting cold soon. No one wants this change, but you can console yourself is with apple picking and boozy beverages. And all good Columbus residents know that Salty Caramel is the best Jeni’s Splendid Ice Cream flavor, right? So when you combine apples, Salty Caramel and OYO Whiskey, magic happens. READ MORE…

Winter is Coming: Pumpkin Beer Chili

Winter is Coming: Pumpkin Beer Chili
If you are anything like me, you have a ton of of straggler pumpkin beers in your fridge. You know, the six packs where you get super pumped about fall, and buy a bunch of “basic” pumpkin brews. I have the solution for the impending winter temps – using leftover pumpkin beer for this ultra-satisfying chili. It’s perfect for tailgating and cozying up on cold winter nights. READ MORE…

Get Rich or Pie Trying: Boozy Berry Hand Pies

Get Rich or Pie Trying: Boozy Berry Hand Pies
Columbus is having a bit of a Pie Renaissance. From savory spinach delights at Lineage Brewing, to the Honeykiss Bakery Salted Chocolate Pie (swoon!) at the Ohio Taproom, it’s obvious that alcohol and pie are a perfect pairing. The only thing better? Putting a favorite local spirit, OYO Stone Fruit Vodka, in your pie! These flaky blueberry-laden delights are your drink and dessert in one, and are dangerously easy to create. Think of them like a boozy adult pop-tart! READ MORE…

Float On: five recipes for booze-filled floats

Caramel Apple Shine
If you’ve ever been to The Whitney House, you know about boozy floats. These adults-only concoctions are the ideal way to combine your desire to imbibe and satisfy your sweet tooth at the same time. Because let’s be honest – the only way to improve the classic root beer float is to add alcohol to it! Fortunately, Columbus has some great breweries and distilleries as well as ice cream artisans which are perfect for pairing. Here are five floats for you to fancy: READ MORE…

Wine Down: Wine Slushies

Wine Slushies
Slushies are for adults too! Nothing cools you down like a frozen treat, and adding wine to anything is a good idea, so whipping up a batch of wine slushies is the perfect way to beat the summer heat. I used the Lake View White blend from Buckeye Lake Winery in my concoction, and they were slurped up in no time! READ MORE…

Mini Lemon Tarts

Mini Lemon Tarts

I love lemon anything, whether it’s roasting chicken with lemon wedges, making limoncello with friends, or scarfing down the luscious lemon tarts at Pistachia Vera bakery. Especially once the cold hits, there’s nothing like that tangy citrus punch to recall warmer weather. I’m crazy about any dessert that takes less than 30 minutes to pull together too, so these mini lemon tarts fit the bill for simple and scrumptious.

Mini Lemon Tarts

Yield: 6 tarts

Ingredients

5 Tbsp. melted butter
1 1/4 c. graham cracker crumbs
1/4 c. sugar
1/2 tsp. salt
1 jar of lemon curd – 10 oz.

Whipped cream or meringue for topping.

Graham cracker crust

Start by preheating the oven to 350 degrees. Next, begin mixing the melted butter, sugar, and graham cracker crumbs in a medium bowl until combined. Then, dividing the mixture evenly into six portions, sprinkle it into a muffin tin’s six separate holes. Press the crumbs firmly into the bottom of the muffin tin and up the sides, forming a crust for the tart. Bake the shells for 7 minutes or until just starting to brown.

Lemon Tart filling and crust

Let the crusts cool completely in the muffin tin. Then, using the whole jar of lemon curd, divide the curd between the shells, scooping spoonfuls into each tart equally.

Refrigerate the tarts in the muffin tin for 3 hours. Pop the tarts out and top them with whipped cream, or torch a little meringue for a miniature version of a lemon meringue pie. Store in the fridge if not serving immediately, but you should probably devour these quickly or risk not getting one!

Mini Lemon Tarts

Where are my lemon-heads? Share this recipe with the citrus-lover in your life here!

Keep Connected,

Caroline

Mini Lemon Tarts
Author: 
Recipe type: Dessert
Prep time: 
Cook time: 
Total time: 
Serves: 6
 
Ingredients
  • 5 Tbsp. melted butter
  • 1¼ c. graham cracker crumbs
  • ¼ c. sugar
  • ½ tsp. salt
  • 1 jar of lemon curd - 10 oz.
  • Whipped cream or meringue for topping.
Instructions
  1. Start by preheating the oven to 350 degrees.
  2. Next, begin mixing the melted butter, sugar, and graham cracker crumbs in a medium bowl until combined.
  3. Then, dividing the mixture evenly into six portions, sprinkle it into a muffin tin's six separate holes.
  4. Press the crumbs firmly into the bottom of the muffin tin and up the sides, forming a crust for the tart.
  5. Bake the shells for 7 minutes or until just starting to brown.
  6. Let the crusts cool completely in the muffin tin.
  7. Then, using the whole jar of lemon curd, divide the curd between the shells, scooping spoonfuls into each tart equally.
  8. Refrigerate the tarts in the muffin tin for 3 hours.
  9. Pop the tarts out and top them with whipped cream, or torch a little meringue for a minature version of a lemon meringue pie.


Pumpkin Spice Latte Waffles

Pumpkin Spice Latte Waffles

Bust out your scarves, firepits, and plaid shirts folks! The season of all-pumpkin everything is upon us. I’ve already sampled pumpkin cream cheese, pumpkin spice cookies, and of course pumpkin-infused chai and lattes. But have you stepped up your breakfast game with the addition of America’s favorite fall treat? These Pumpkin Spice Latte Waffles are so easy, will satisfy your seasonal cravings, and make you the hero of the kitchen – no trip to a fancy coffee shop required. These are super-tender waffles, not crunchy Belgian-style ones. Learn more below!

Pumpkin Spice Latte Waffles

Yield – 4-6 waffles, depending on the size of your waffle iron

Ingredients

1 1/2 c. flour
1/2 c. sugar
1/2 tsp. baking soda
1/2 tsp baking powder
1/4 tsp. nutmeg
1/4 tsp. ginger
1/2 tsp. cinnamon
2 Tbsp. espresso powder
1 pinch of salt
1 15 oz can pureed pumpkin (not pumpkin pie filling)
1/4 c. melted butter
1/2 c. milk
2 eggs, beaten
1 tsp. vanilla
1 Tbsp. molasses

Dig out your waffle iron and preheat it to a medium setting. Start by mixing together the dry ingredients in a large bowl, combining all items from the flour through the salt.

Ingredients for Pumpkin Spice Latte Waffles

In another large bowl, whisk together the remaining ingredients, from the pumpkin to the molasses. Slowly fold the flour mixture into the pumpkin mixture, stirring together until just combined. Do not over-mix the batter.

Spray the waffle iron with non-stick cooking spray, and ladle the batter onto the iron, according to manufacturer’s recommended amounts. Cook each waffle until completely set and just starting to brown. Serve immediately.

I wouldn’t hesitate to top these pumpkin delights with whipped cream and caramel, or they’d be equally scrumptious with some apple cider syrup. Cue the falling leaves!

PSL Waffles

Do you have another favorite pumpkin recipe to share? Let me know by dropping me a note here.

Keep Connected,

Caroline

Pumpkin Spice Latte Waffles
Author: 
Prep time: 
Cook time: 
Total time: 
Serves: 4-6
 
Ingredients
  • 1½ c. flour
  • ½ c. sugar
  • ½ tsp. baking soda
  • ½ tsp baking powder
  • ¼ tsp. nutmeg
  • ¼ tsp. ginger
  • ½ tsp. cinnamon
  • 2 Tbsp. espresso powder
  • 1 pinch of salt
  • 1 15 oz can pureed pumpkin (not pumpkin pie filling)
  • ¼ c. melted butter
  • ½ c. milk
  • 2 eggs, beaten
  • 1 tsp. vanilla
  • 1 Tbsp. molasses
Instructions
  1. Dig out your waffle iron and preheat it to a medium setting.
  2. Start by mixing together the dry ingredients in a large bowl, combining all items from the flour through the salt.
  3. In another large bowl, whisk together the remaining ingredients, from the pumpkin to the molasses.
  4. Slowly fold in the flour mixture, stirring together until just combined. Do not over-mix the batter.
  5. Spray the waffle iron with non-stick cooking spray, and ladle the batter onto the iron, according to manufacturer's recommended amounts.
  6. Cook each waffle until completely set and just starting to brown. Serve immediately.


Fresh Corn Cakes with Spicy Shredded Beef

Fresh Corn Cakes with Spicy Shredded Beef

Confession: I hate eating corn on the cob. The kernels get in my teeth and the butter always drips off – a cardinal sin in my book. My mom always cut her corn off the cob, so I blame her. At any rate, we always end up with a bunch of leftover sweet corn at our house and these corn cakes are a great way to use up the last of those lingering ears. If you haven’t had pancakes in a savory variation before, please try this recipe. It’s easy to make the beef ahead of time, and the apple cider will get you in the fall spirit!

Fresh Corn Cakes with Spicy Shredded Beef
Serves 4

For the Beef:
3 lb. beef brisket or chuck roast
1 14.5 oz can of diced tomatoes
1 large onion, diced
1 red bell pepper, diced
2 chipotle peppers in adobo sauce, diced
1 10 oz can enchilada sauce
1 packet taco seasoning
1 cup apple cider

For the Corn Cakes:
1 pkg. corn muffin mix (I used Jiffy)
1 egg
1/2 c. milk
2 T. melted butter
2 ears fresh sweet corn, taken off the cob

For Topping:
1 c. shredded cheddar cheese
1/2 c. sour cream
Handful chopped cilantro
Your other favorite toppings: avocado or guacamole, tomatoes, or hot sauce

In a crock pot, toss in all the shredded beef ingredients. Cook on low for 6-8 hours or high for 3-4 hours, until meat is fully cooked. Take the beef out and shred it, then return it to the crock pot so it can soak up all those juices!

Spicy Shredded Beef

Whisk together the corn cake ingredients in a large bowl. Let the mixture set for 10 minutes to thicken. Next, cook and flip the cakes until crispy on a greased and heated griddle, just like you would pancakes. There should be enough for 8 generous corn cakes.

Corn Cakes with Spicy Shredded Beef

Plate up the corn cakes next. Layer two cakes with the beef, a ladle of the crockpot sauce, a dollop of sour cream, and a sprinkle of cheese and cilantro. Pile it high with the fixin’s of your choice, and gobble them up!

Keep Connected,

Caroline

Fresh Corn Cakes with Spicy Shredded Beef
Author: 
Prep time: 
Cook time: 
Total time: 
Serves: 4
 
Ingredients
  • 3 lb. beef brisket or chuck roast
  • 1 14.5 oz can of diced tomatoes
  • 1 large onion, diced
  • 1 red bell pepper, diced
  • 2 chipotle peppers in adobo sauce, diced
  • 1 10 oz can enchilada sauce
  • 1 packet taco seasoning
  • 1 cup apple cider
For the Corn Cakes:
  • 1 pkg. corn muffin mix (I used Jiffy)
  • 1 egg
  • ½ c. milk
  • 2 T. melted butter
  • 2 ears fresh sweet corn, taken off the cob
For Topping:
  • 1 c. shredded cheddar cheese
  • ½ c. sour cream
  • Handful chopped cilantro
  • Your other favorite toppings: avocado or guacamole, tomatoes, or hot sauce
Instructions
Beef
  1. In a crock pot, toss in all the shredded beef ingredients.
  2. Cook on low for 6-8 hours or high for 3-4 hours, until meat is fully cooked.
  3. Take the beef out and shred it, then return it to the crock pot so it can soak up all those juices!
Corn Cakes
  1. Whisk together the corn cake ingredients in a large bowl.
  2. Let the mixture set for 10 minutes to thicken.
  3. Next, cook and flip the cakes until crispy on a greased and heated griddle, just like you would pancakes. There should be enough for 8 generous corn cakes.
  4. Plate up the corn cakes next.
  5. Layer two cakes with the beef, a ladle of the crockpot sauce, a dollop of sour cream, and a sprinkle of cheese and cilantro.
  6. Pile it high with the fixin's of your choice, and gobble them up!


Sausage & Gravy Breakfast Skillets

Video Post

Sausage & Gravy Breakfast Skillets

I loved the sweet and salty cookie skillets recipe so much that it’s time to bust out those mini cast iron skillets again! This time though it’s for breakfast, and it’s super easy to make. The dish is completely customizable, so add your own flair with additional veggies or swap the sausage gravy for bacon pieces. This is one of my go-to lazy weekend morning recipes!

Sausage & Gravy Breakfast Skillets

Ingredients:

Skillets
2 cups cubed bread
1 c. sausage gravy (recipe below)
4 eggs
Salt & pepper to taste
1/2 tsp. chives
1/2 cup cheddar cheese
Hot sauce, for topping

Evenly distribute the cubed bread inside of two mini cast iron skillets. Place the skillets in the oven to toast the bread until just browned; then remove them from the oven. Add 1/2 cup sausage gravy on top of the layer of bread. Next, crack 2 eggs into each skillet and place the skillets in a 350 degree oven until the eggs are cooked as desired, about 10 minutes.

When the eggs are cooked, remove the skillets from the oven and add the chives & cheddar cheese. Place the skillets back in the oven until the cheese is just melted.

Finally, remove the skillets from the oven and place a dash of hot sauce on each. Enjoy!

Gravy
1 lb sausage
1/3 cup flour
3 cups 2% milk
1/4 tsp garlic powder
1/2 tsp salt
1/2 tsp black pepper

1. Brown the sausage
2. Sprinkle in the flour and cook mixture until flour is absorbed
3. Slowly whisk in the milk and seasonings and let mixture thicken

Keep Connected,

Caroline

Pulled Pork Cornbread Bites with White BBQ Sauce

Pulled Pork Cornbread Bites with White BBQ Sauce
Cornbread in all its forms is near and dear to my heart. There is nothing better than a piping hot wedge of cornbread, just removed from a cast iron skillet, and I love a breakfast of leftover cornbread mixed with milk and brown sugar, just like my dad taught me. And nothing is better than a meal of cornbread and BBQ. But have you ever used cornbread as a base for appetizers? This recipe is super simple, and it starts with City Barbeque (or your favorite pulled pork) and Jiffy corn muffin mix. A quick drizzle of some homemade white BBQ sauce jazzes up these tasty bites.

Pulled Pork Cornbread Bites

Ingredients

1 box Jiffy corn muffin mix
1 egg
1/3 c. milk
1 c. of your favorite pulled pork (I used City Barbeque)
1/4 c. store-bought sweet BBQ sauce
1/4 c. homemade white BBQ sauce, recipe follows
Chopped chives, for garnish

Yield: 16 mini bites

Preheat the oven to 400° F. Mix up the package of Jiffy cornbread mix according to directions, adding the egg and the milk as directed. Pour the batter into a mini muffin pan, dividing the mixture between 16 holes. Do not over-fill.  Bake the mini cornbread muffins until just golden, about 12 minutes.

While the cups are still warm, take the end of a knife or a spatula and press into the cornbread, wiggling in a gentle circle to create an indentation. This will create a well to hold the pulled pork. Let cool completely.

Mini Corn Bread Cups

Next take the cup of pulled pork and stir in your favorite red BBQ sauce, completely coating the meat. I like to use a sweet BBQ, but spicy sauce would be great too! Stuff the BBQ sauce and pork mixture into the center of the cornbread cups. Sprinkle with chives and drizzle of white BBQ sauce on each cornbread bite.

Pulled Pork Cornbread Cups

White BBQ Sauce

1/2 c mayonnaise
1 T. apple cider vinegar
1 t. Worcestershire sauce
1 t. sugar
1 dash hot sauce
1/4 t. garlic powder
1/4 t. salt
1/4 t. pepper

Combine all ingredients with a whisk until well-incorporated. Refrigerate for 1 hour to allow flavors to blend.  This sauce is also great on burgers or french fries!

Keep Connected,

Caroline

Pulled Pork Cornbread Bites with White BBQ Sauce
Prep time: 
Cook time: 
Total time: 
Serves: 16
 
Ingredients
  • 1 box Jiffy corn muffin mix
  • 1 egg
  • ⅓ c. milk
  • 1 c. of your favorite pulled pork (I used City BBQ)
  • ¼ c. store-bought sweet BBQ sauce
  • ¼ c. homemade white BBQ sauce, recipe follows
  • Chopped chives, for garnish
Instructions
  1. Preheat the oven to 400° F.
  2. Mix up the package of Jiffy cornbread mix according to directions, adding the egg and the milk as directed.
  3. Pour the batter into a mini muffin pan, dividing the mixture between 16 holes. Do not over fill.
  4. Bake the mini cornbread muffins until just golden, about 12 minutes.
  5. While the cups are still warm, take the end of a knife or a spatula and press into the cornbread, wiggling in a gentle circle to create an indentation. This will create a well to hold the pulled pork. Let cool completely.
  6. Next take the cup of pulled pork and stir in your favorite red BBQ sauce, completely coating the meat.
  7. Stuff the BBQ sauce and pork mixture into the center of the cornbread cups.
  8. Sprinkle with chives and drizzle of white BBQ sauce on each cornbread bite.